


29 May 4. Solution Management
How Can We Help?
This chapter introduces how to create, edit, delete, import, export and publish solutions.
Creating Solutions
Get the screen size before creating solutions.
Step 1 Click New.
Step 2 Enter the solution name, screen width and height, and then click OK. The editing page
of the solution appears, as shown in Figure 4-1. Each area of the page is explained in
Table 4-1.
Figure 4-1 Editing page of a solution
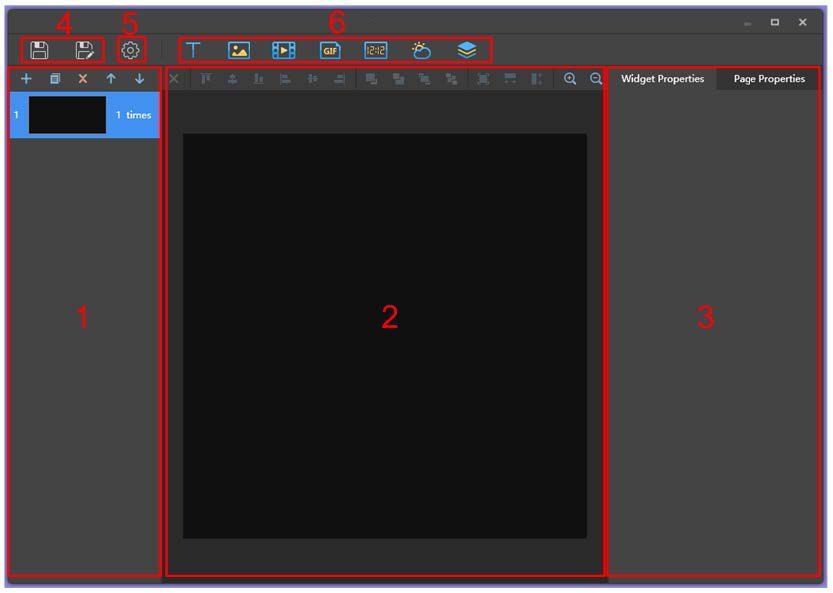 Table 4-1 Description of the editing page of a solution
| Name | Descrioption |
| Editing area of solution page | Create, copy and delete pages, and adjust the order of pages. Pages are played according to the order from the |
| Editing area of page media | Delete media and adjust media layout. Before operation, click to select the media. |
| Property editing area | Edit widget properties and page properties. Widgets are the media added in pages. Before editing the widget properties, click to select a widget. |
| Buttons for saving | Save a solution and save a solution as another solution. |
| Setting button | Set the default playing duration of a media. |
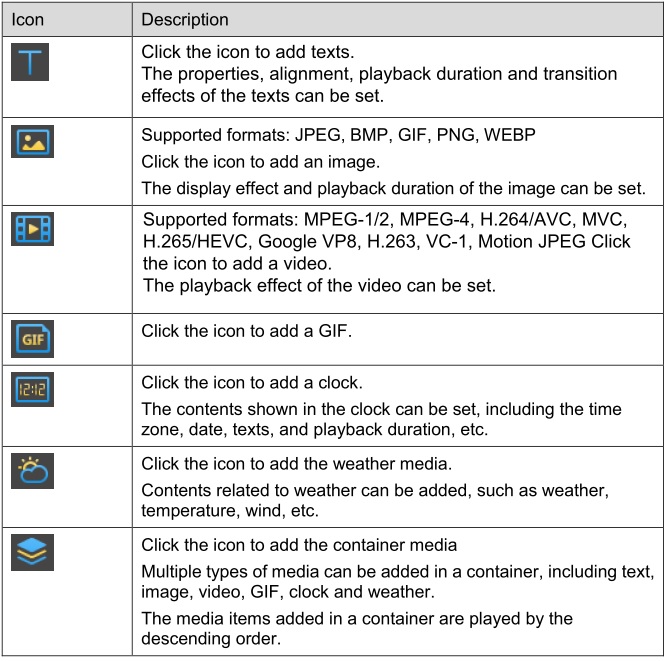
| Buttons for adding media | Add media to a solution page. |
SunX Pro supports multiple types of media, as described in Table 4-2.
Step 3 After the solution is edited, click![]() to save.
to save.
Editing Solutions
In the solution list, select a solution and click Edit to enter the editing page.
Deleting Solutions
In the solution list, select a solution and click Delete.
Importing Solutions
Step 1 Click Import.
Step 2 In the pop-up dialog box, click ![]() to select the file path.
to select the file path.
Step 3 Click Next.
Step 4 When Progress shows 100%, click Done.
Exporting Solutions
Only the solutions that contain media can be exported.
Step 1 In the solution list, perform any of the following operations.
- Exporting a single solution: Click
 corresponding to the target solution.
 - Exporting solutions in batch: Select multiple solutions and click Export.
Step 2 In the pop-up dialog box, click![]() to select the file path.
to select the file path.
Step 3 Click Export.
Step 4 When Progress shows 100%, click Next.
Step 5 Select the play mode and solution.
- Plug and play: As soon as the USB drive that stores the solution is inserted into
the X series, the solution will be played. During playing, the USB drive cannot be
removed. - Copy and play: After the solution that is stored in the USB drive is copied to the
X series, the solution will be played. During playing, the USB drive can be removed.
Step 6 Click OK.
Step 7 Enter the X series login password and click OK. If you click Skip, the X series will not identify the file.
After the USB drive that stores the solution is inserted into the X series, the solution
will be played only if the passwords match.
Publishing Solutions
- A solution can be published after media are added to the solution.
- Only one solution can be sent to terminals each time.
- One solution can be sent to multiple terminals simultaneously.
Step 1 Select a solution in the solution list and click Publish, or click![]() next to the solution information.
next to the solution information.
Step 2 Click Refresh in the Publish solution dialog box to show the information of terminals which are logged in.
Step 3 Select one or more terminals and click Publish.
Step 4 When Progress shows 100%, click Done.